Building a Timer Clock

Niraj Chaurasiya
03 June 2024
Visit at:
https://timer.nirajchaurasiya.com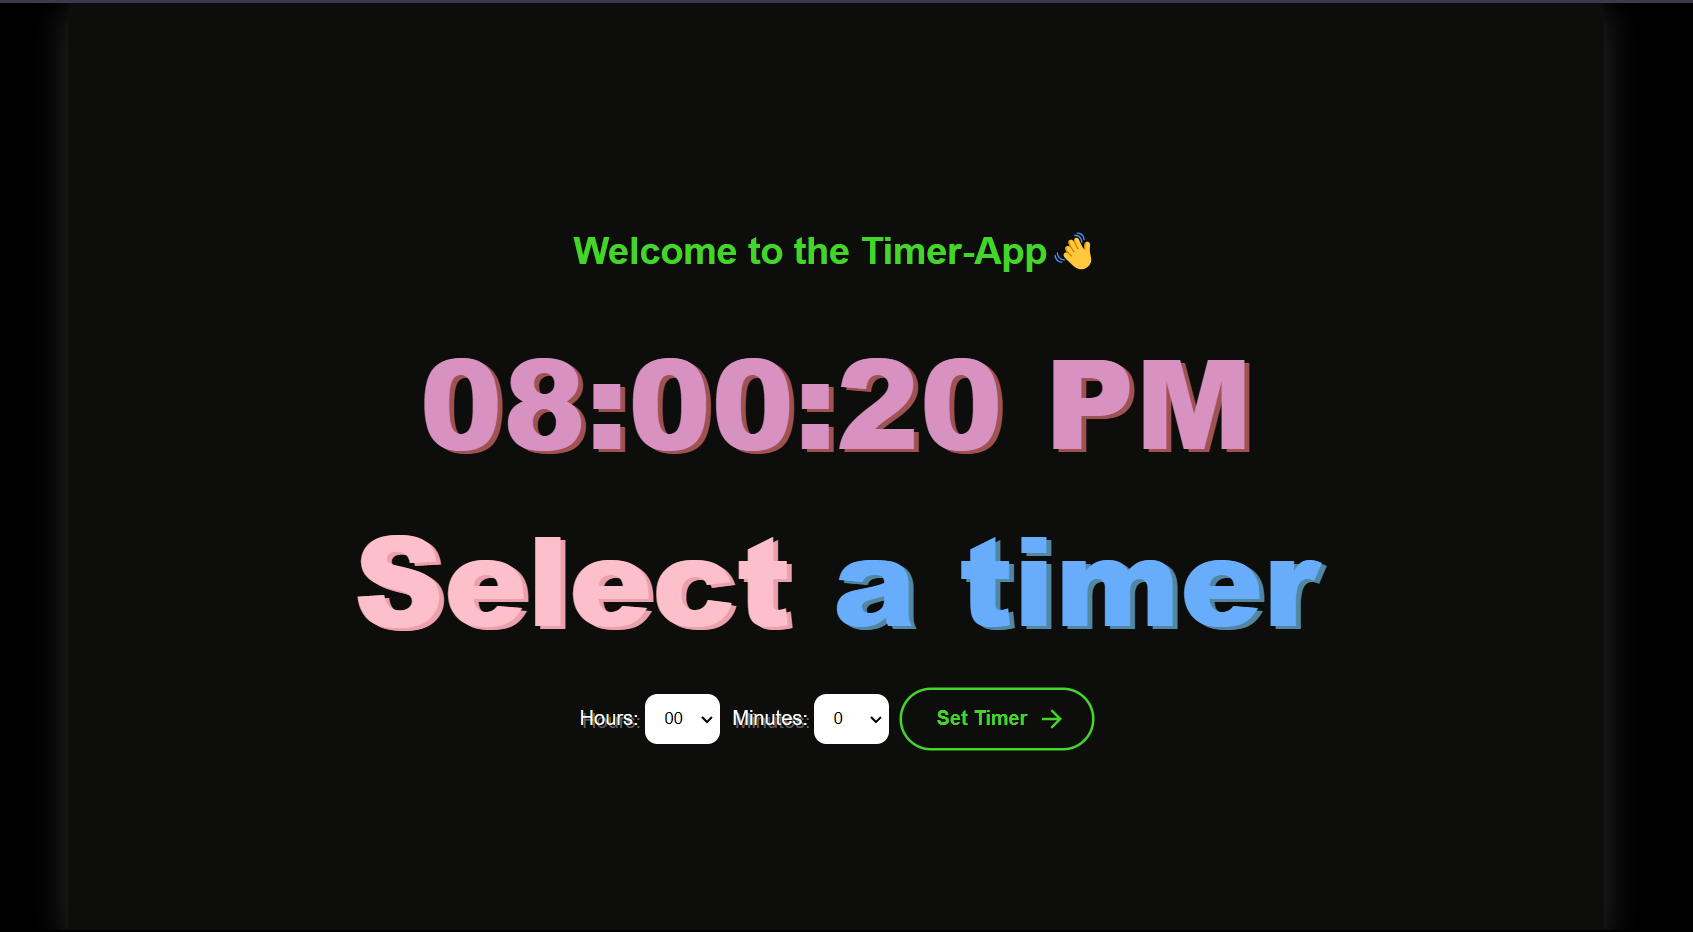
Table of Contents
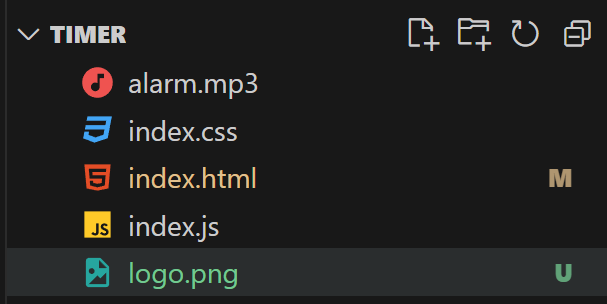
Downloadable Assets
Initializing a project
Now, you have done downloading with the required assets from above.
Its time to initialize a project.
In the same folder where you download the both assets, make three files as index.html, index.css, index.js.
Such that:
Structuring the site with HTML
Now that we are done with downloading assets and initializing a project, lets create the structure with HTML.
Firstly, go inside index.html file and write the basic HTML strucuture code.
<!DOCTYPE html>
<html lang="en">
  <head>
    <meta charset="UTF-8" />
    <link rel="stylesheet" href="index.css" />
    <link rel="shortcut icon" href="logo.png" type="image/x-icon" />
    <meta name="viewport" content="width=device-width, initial-scale=1.0" />
    <title>Timer-App</title>
  </head>
  <body>

  </body>
  <script src="index.js"></script>
</html>
In the above code, we also include index.css and index.js along with the logo.
Now, we will create a div with class name, container with the heading inside the body. We also added two div as id clock and timer. The div with ID clock will be responsible for showing the current time.
And, the div with ID timer will be responsible for fetching the time dynamically set by user and showing the timer in decreasing format.
<div id="container">
    <h3 class="top-msg">Welcome to the Timer-App👋</h3>
    <div id="clock"></div>
    <div id="timer"></div>
</div>
Now, we will add a div with class name dropdown after the div with ID timer. This will be responsible for all the actions that user can perform like setting up hours, minutes, and start a timer.
The code looks like:
<div class="dropdown">
    <label for="hours">Hours:</label>
        <select id="hours">
            <!-- Add hours dynamically -->
        </select>

    <label for="minutes">Minutes:</label>
        <select id="minutes">
            <!-- Add minutes dynamically -->
        </select>

    <button class="animated-button" id="startCustomTimerButton">
        <svg
          viewBox="0 0 24 24"
          class="arr-2"
          xmlns="http://www.w3.org/2000/svg"
        >
          <path
            d="M16.1716 10.9999L10.8076 5.63589L12.2218 4.22168L20 11.9999L12.2218 19.778L10.8076 18.3638L16.1716 12.9999H4V10.9999H16.1716Z"
          ></path>
        </svg>
        <span class="text">Set Timer</span>
        <span class="circle"></span>
        <svg
          viewBox="0 0 24 24"
          class="arr-1"
          xmlns="http://www.w3.org/2000/svg"
        >
          <path
            d="M16.1716 10.9999L10.8076 5.63589L12.2218 4.22168L20 11.9999L12.2218 19.778L10.8076 18.3638L16.1716 12.9999H4V10.9999H16.1716Z"
          ></path>
        </svg>
    </button>
</div>
We are going to add hours and minutes options dynamically with JS.
The final HTML codes look like:
<!DOCTYPE html>
<html lang="en">
  <head>
    <meta charset="UTF-8" />
    <link rel="stylesheet" href="index.css" />
    <link rel="shortcut icon" href="logo.png" type="image/x-icon" />
    <meta name="viewport" content="width=device-width, initial-scale=1.0" />
    <title>Timer-App</title>
  </head>
  <body>
    <div id="container">
      <h3 class="top-msg">Welcome to the Timer-App👋</h3>
      <div id="clock"></div>
      <div id="timer"></div>

      <div class="dropdown">
        <label for="hours">Hours:</label>
        <select id="hours">
          <!-- Add hours dynamically -->
        </select>

        <label for="minutes">Minutes:</label>
        <select id="minutes">
          <!-- Add minutes dynamically -->
        </select>

        <button class="animated-button" id="startCustomTimerButton">
          <svg
            viewBox="0 0 24 24"
            class="arr-2"
            xmlns="http://www.w3.org/2000/svg"
          >
            <path
              d="M16.1716 10.9999L10.8076 5.63589L12.2218 4.22168L20 11.9999L12.2218 19.778L10.8076 18.3638L16.1716 12.9999H4V10.9999H16.1716Z"
            ></path>
          </svg>
          <span class="text">Set Timer</span>
          <span class="circle"></span>
          <svg
            viewBox="0 0 24 24"
            class="arr-1"
            xmlns="http://www.w3.org/2000/svg"
          >
            <path
              d="M16.1716 10.9999L10.8076 5.63589L12.2218 4.22168L20 11.9999L12.2218 19.778L10.8076 18.3638L16.1716 12.9999H4V10.9999H16.1716Z"
            ></path>
          </svg>
        </button>
      </div>
    </div>
  </body>
  <script src="index.js"></script>
</html>
Styling with CSS
CSS codes are simple to understand, so I will not explain those. I will provide you with the code directly.
Below is the all CSS codes.
body {
    margin: 0;
    padding: 0;
    box-sizing: border-box;
    background-color: rgb(0, 0, 0);
    color: white;
    font-family: Arial, sans-serif;
  }

  #container {
    background-color: #0d0d0c;
    width: 80vw;
    margin: auto;
    display: flex;
    flex-direction: column;
    align-items: center;
    justify-content: center;
    min-height: 100vh;
    box-shadow: rgba(50, 51, 50, 0.888) 0px 7px 29px 0px;
  }

  #clock,
  #timer {
    text-align: center;
    font-size: 100px;
  }

  @media (max-width: 1000px) {
    #clock,
    #timer {
      text-align: center;
      font-size: 80px;
    }
  }

  @media (max-width: 815px) {
    #clock,
    #timer {
      text-align: center;
      font-size: 60px;
    }
  }

  @media (max-width: 610px) {
    #clock,
    #timer {
      text-align: center;
      font-size: 40px;
    }
  }

  @media (max-width: 560px) {
    #clock,
    #timer {
      text-align: center;
      font-size: 30px;
    }
    .dropdown {
      display: flex;
      flex-direction: column;
      gap: 20px;
      align-items: center;
      margin-top: 20px;
    }
    select {
      padding: 10px 40px !important;
      border: 2px solid rgb(255, 255, 255);
      border-radius: 10px;
      background-color: white;
      color: black;
      margin-right: 10px;
    }
    .message-sign {
      color: rgb(253, 192, 202);
      text-shadow: 1px 1px 0 rgb(236, 159, 172) !important;
    }
    .message-sign span {
      color: rgb(104, 173, 252);
      text-shadow: 1px 1px 0 rgb(81, 135, 160) !important;
    }
    .time-sign {
      color: rgb(215, 146, 194);
      text-shadow: 1px 1px 0 rgb(160, 81, 81) !important;
    }
    .dropdown {
      text-shadow: 2px 2px 0 rgb(100, 97, 97);
    }
  }

  #clock span,
  #timer span {
    font-weight: 800;
  }

  .animated-button {
    position: relative;
    display: flex;
    align-items: center;
    gap: 4px;
    padding: 10px 36px;
    border: 4px solid;
    border-color: transparent;
    font-size: 16px;
    background-color: inherit;
    border-radius: 100px;
    font-weight: 600;
    color: #44d52a;
    box-shadow: 0 0 0 2px #44d52a;
    cursor: pointer;
    overflow: hidden;
    transition: all 0.6s cubic-bezier(0.23, 1, 0.32, 1);
  }

  .animated-button svg {
    position: absolute;
    width: 24px;
    fill: #44d52a;
    z-index: 9;
    transition: all 0.8s cubic-bezier(0.23, 1, 0.32, 1);
  }

  .animated-button .arr-1 {
    right: 16px;
  }

  .animated-button .arr-2 {
    left: -25%;
  }

  .animated-button .circle {
    position: absolute;
    top: 50%;
    left: 50%;
    transform: translate(-50%, -50%);
    width: 20px;
    height: 20px;
    background-color: #44d52a;
    border-radius: 50%;
    opacity: 0;
    transition: all 0.8s cubic-bezier(0.23, 1, 0.32, 1);
  }

  .animated-button .text {
    position: relative;
    z-index: 1;
    transform: translateX(-12px);
    transition: all 0.8s cubic-bezier(0.23, 1, 0.32, 1);
  }

  .animated-button:hover {
    box-shadow: 0 0 0 12px transparent;
    color: #212121;
    border-radius: 12px;
  }

  .animated-button:hover .arr-1 {
    right: -25%;
  }

  .animated-button:hover .arr-2 {
    left: 16px;
  }

  .animated-button:hover .text {
    transform: translateX(12px);
  }

  .animated-button:hover svg {
    fill: #212121;
  }

  .animated-button:active {
    scale: 0.95;
    box-shadow: 0 0 0 4px #44d52a;
  }

  .animated-button:hover .circle {
    width: 220px;
    height: 220px;
    opacity: 1;
  }

  .dropdown {
    display: flex;
    align-items: center;
    margin-top: 20px;
  }

  label {
    margin-right: 5px;
    font-size: 1em;
    color: white;
  }

  select {
    padding: 10px;
    border: 2px solid rgb(255, 255, 255);
    border-radius: 10px;
    background-color: white;
    color: black;
    margin-right: 10px;
  }

  button.startCustomTimer {
    padding: 10px 20px;
    border-radius: 20px;
  }
  .message-sign {
    color: rgb(253, 192, 202);
    text-shadow: 4px 2px 0 rgb(236, 159, 172);
  }
  .message-sign span {
    color: rgb(104, 173, 252);
    text-shadow: 4px 2px 0 rgb(81, 135, 160);
  }
  .time-sign {
    color: rgb(215, 146, 194);
    text-shadow: 4px 2px 0 rgb(160, 81, 81);
  }
  .dropdown {
    text-shadow: 2px 2px 0 rgb(100, 97, 97);
  }

  .top-msg {
    font-size: 30px;
    color: #44d52a;
    text-align: center;
  }
Adding logic with JS!
To understand the JS codes in-depth, please watch the video embeded below.
For now, I will write all the JS code together!
  const hours = document.querySelector("#hours");
  const startCustomTimerButton = document.querySelector(
    "#startCustomTimerButton"
  );

  function startCustomTimer() {
    // Get the selected values from the dropdowns
    const selectedHours = document.querySelector("#hours").value;
    const selectedMinutes = document.querySelector("#minutes").value * 5;
    console.log(selectedHours);
    console.log(selectedMinutes);
    // Convert hours and minutes to seconds
    const durationInSeconds = selectedHours * 3600 + selectedMinutes * 60;

    // Start the custom timer
    startTimer(durationInSeconds);
  }

  startCustomTimerButton.addEventListener("click", startCustomTimer);

  const optionsHTML = [0, 1, 2, 3, 4, 5, 6, 7, 8, 9, 10, 11, 12, 15, 20, 24]
    .map(
      (e) => `
    <option key="${e}" value="${e}">
      ${e.toString().padStart(2, "0")}
    </option>
  `
    )
    .join("");

  hours.insertAdjacentHTML("afterbegin", optionsHTML);

  const minutes = document.querySelector("#minutes");

  const minutesOptionsHTML = [0, 1, 2, 3, 4, 5, 6, 7, 8, 9, 10, 11, 12]
    .map(
      (e) => `
    <option key="${e}" value="${e}">
      ${e * (5).toString().padStart(2, "0")}
    </option>
  `
    )
    .join("");

  minutes.insertAdjacentHTML("afterbegin", minutesOptionsHTML);

  const timer = document.querySelector("#timer");
  const clock = document.querySelector("#clock");
  let currentTimerId; // Store the current timer ID

  function updateClock() {
    const getTime = new Date();
    let hours =
      getTime.getHours() >= 10 ? getTime.getHours() : getTime.getHours();
    let minutes =
      getTime.getMinutes() >= 10
        ? getTime.getMinutes()
        : "0" + getTime.getMinutes();
    let seconds =
      getTime.getSeconds() >= 10
        ? getTime.getSeconds()
        : "0" + getTime.getSeconds();
    let formatHours = hours > 12 ? hours - 12 : hours;
    formatHours = formatHours >= 10 ? formatHours : "0" + formatHours;
    let isAM_PM = hours > 12 ? "PM" : "AM";
    let timeInMinutesAndSeconds =
      formatHours + `:` + minutes + `:` + seconds + ` ` + isAM_PM;

    // Update the content of the #clock element
    clock.innerHTML = `<span class="time-sign">${timeInMinutesAndSeconds}</span>`;
  }

  // Initial call to update the clock
  updateClock();

  setInterval(updateClock, 1000);

  // timer
  function startTimer(durationInSeconds) {
    // Clear the previous timer content
    timer.innerHTML = "";

    let timeRemaining = durationInSeconds;

    function updateTimer() {
      const hr =
        Math.floor(timeRemaining / 3600) > 9
          ? Math.floor(timeRemaining / 3600)
          : "0" + Math.floor(timeRemaining / 3600);

      let minutes = Math.floor((timeRemaining % 3600) / 60);
      const seconds =
        timeRemaining % 60 < 10 ? "0" + (timeRemaining % 60) : timeRemaining % 60;

      timer.innerHTML = timeRemaining
        ? `<span>${hr}:${
            minutes < 10 ? `0${minutes}` : minutes
          }:${seconds}</span>`
        : `<span class="message-sign">Select  <span>a timer</span> </span>`;

      if (timeRemaining > 0) {
        timeRemaining--;
        currentTimerId = setTimeout(updateTimer, 1000);
      } else {
        playAlarm();
      }
    }

    // Clear the previous timer if it exists
    if (currentTimerId) {
      clearTimeout(currentTimerId);
    }

    updateTimer();
  }

  startTimer();

  function playAlarm() {
    const alarm = new Audio("alarm.mp3");
    alarm.play();
  }
I hope you have gain a solid understanding on making a timer app from scratch.
Follow me on X: https://twitter.com/@loveforrobotics
My YouTube channel link where I share amazing videos like this: https://youtube.com/@niraj.chaurasiya
Video on this project
Tags
html
css
js
timer-app